Microsoft recently introduced more than 1,000 Android apps for US users of Windows 11. If you don’t have a US address, you’ll have to make do without support. Fortunately, there’s more than one way to skin a cat. We tested several third-party tools to run Android apps on Windows 11. In this article, we’ll be guiding you through a quick and easy method.
Microsoft and Amazon are working on official support for Android apps on Windows 11. In late February, Microsoft introduced a Windows 11 beta version with more than 1,000 Android apps.
Unfortunately, the beta version is reserved for holders of a US Amazon account. This account is out of reach for anyone that doesn’t have a US payment address. As such, most non-US residents have no way to run Android apps in a supported environment.
Eventually, the beta version will blow over to Europe, but until then, official support is lacking. Luckily, Android can presently run on Windows 11 through third-party software.
We tested a number of options to find the quickest and simplest way. ‘Sideloading’ is the undisputed winner. This process allows Android apps to be installed and run outside of an official store or environment.
There are multiple ways to sideload apps in Windows 11. In this article, we will be guiding you through our prefered method. The guide below allows you to download and run Android apps on Windows 11.
Note: the screenshots found throughout this guide were taken on a PC running a Dutch version of Windows 11. The wording in images might not reflect the wording of your OS. That shouldn’t be much of a problem, as the guide is entirely text-based. The imagery serves as a visual reference.
Step 1: prerequisites and troubleshooting
We’ll start with the prerequisites. Read this section carefully. If you encounter problems at a later stage, you may not meet the prerequisites, or may have missed a preparatory step.
- 1) You’ll soon be working with Windows Subsystem for Android. To be able to run the program, you’ll need at least 8GB RAM, SSD storage (no HDD) and the following processors (or newer): Intel i3 8th Gen, AMD Ryzen 3000 and Qualcomm Snapdragon 8C.
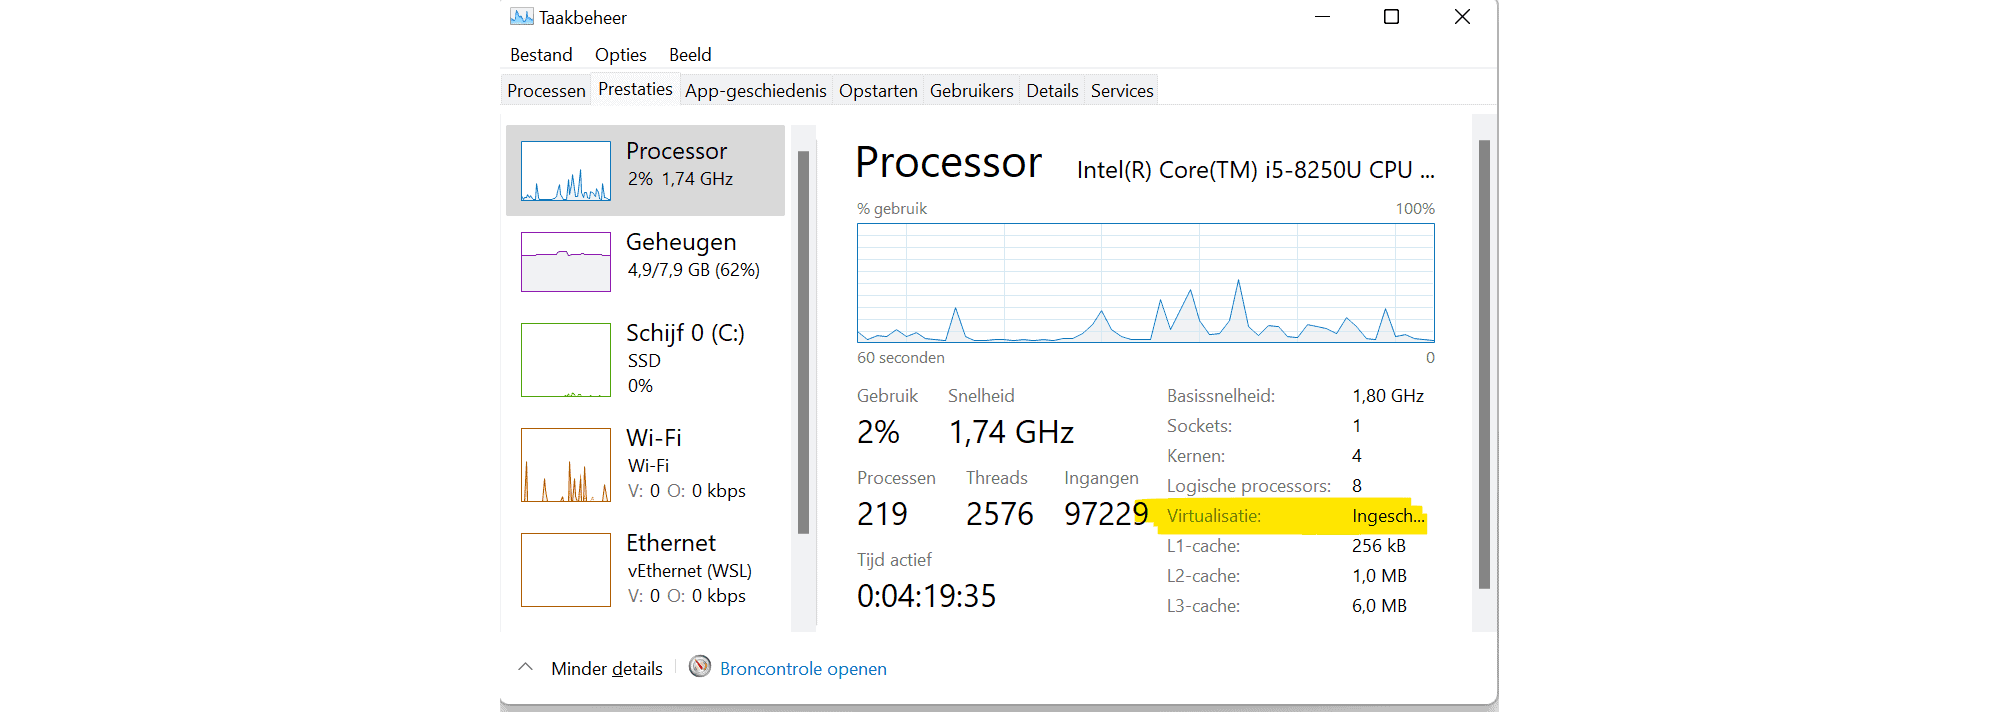
- 2) Windows Subsystem for Android uses virtualization. To run the program, virtualization must be enabled. You can check whether virtualization is enabled with the following steps.
- Navigate to Task Manager (Ctrl+Shift+Esc).
- Press the ‘Performance’ tab.
- Under the graph, you’ll see ‘Virtualization’ and ‘Enabled’ or ‘Disabled’.
- If virtualization is enabled, you can proceed to the next step.
- If virtualization is disabled, you need to enable virtualization through the BIOS. Red Hat has a handy manual for this.
- 3) Our method was tested on Windows 11, build number 22000.527. This was the latest version at the time of writing. If you’re using an older version, we recommend an update. Navigate to Windows Updates via the start menu and accept the latest version. If you’re using a version later than 22000.527, we cannot guarantee that the method will work.
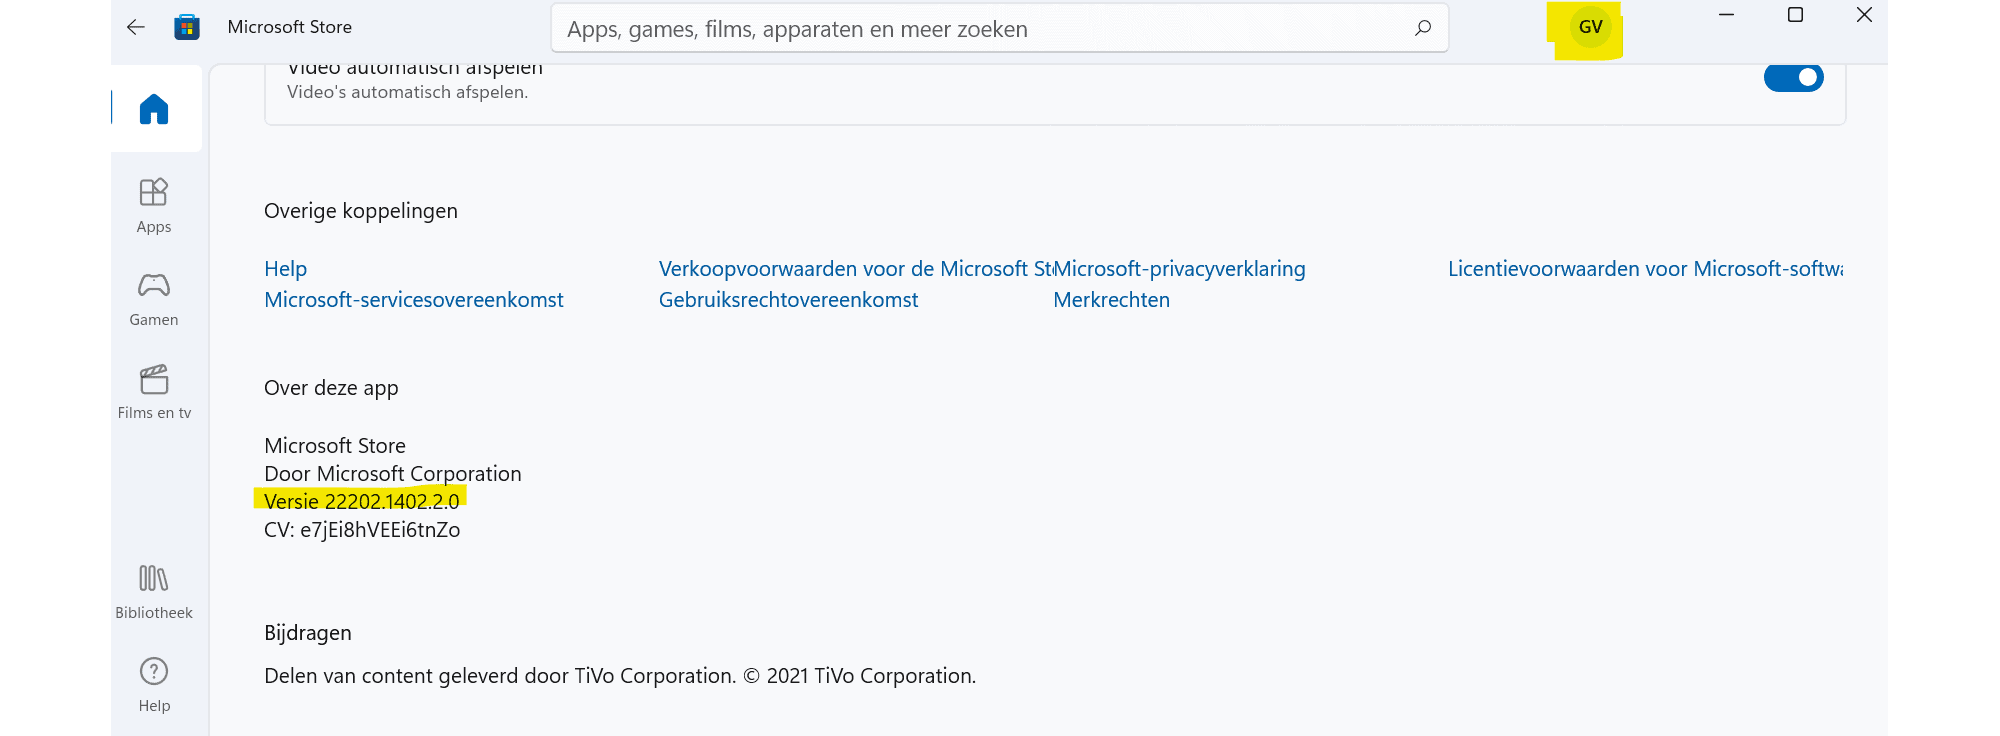
- 4) The Windows Store should be up-to-date as well. You can review your version as follows.
- Open the Windows Store from the start menu, click on the profile button (the one with the first letter of your name) and navigate to ‘App settings’.
- Check your build number at the bottom of the window. We used 22202.1402.2.0. Any version after 22202 will work fine.
- Using an earlier version? Enable automatic updates and the latest version will be retrieved.
- 5) Lastly, we’ll be needing a Windows component: ‘Platform for virtual machine’. Follow the steps below to enable the component.
- Open the Start menu and search for the following term: ‘Windows Components’, without quotes.
- Open the window, scroll down and check the box at ‘Platform for virtual machine’. If the component is already checked, you’re done.
- If the component is not yet enabled, Windows will fetch the necessary software after ticking the box. This may take a while. We received an error message at the first attempt. The second attempt worked. Should something goes wrong, a new attempt may solve the problem.
- Continue with step two.

Step 2: Windows Subsystem for Android
Ultimately, we want to run Android apps on Windows 11. To achieve that goal, we’ll need a way to install and run XAPK and APK files on Windows. These are the two main Android app file types.
The good news is that Microsoft has developed a program to support XAPK and APK files: ‘Windows Subsystem for Android’. The bad news is that this program is supposed to be exclusively available to US users. Fortunately, there is a way to get Windows Subsystem for Android working outside the US.
Using the steps below, you’ll be installing Windows Subsystem for Android in your region. After installation, all we’ll need is a way to find and install apps. We’ll guide you through that from step three onwards. For now: Windows Subsystem for Android.
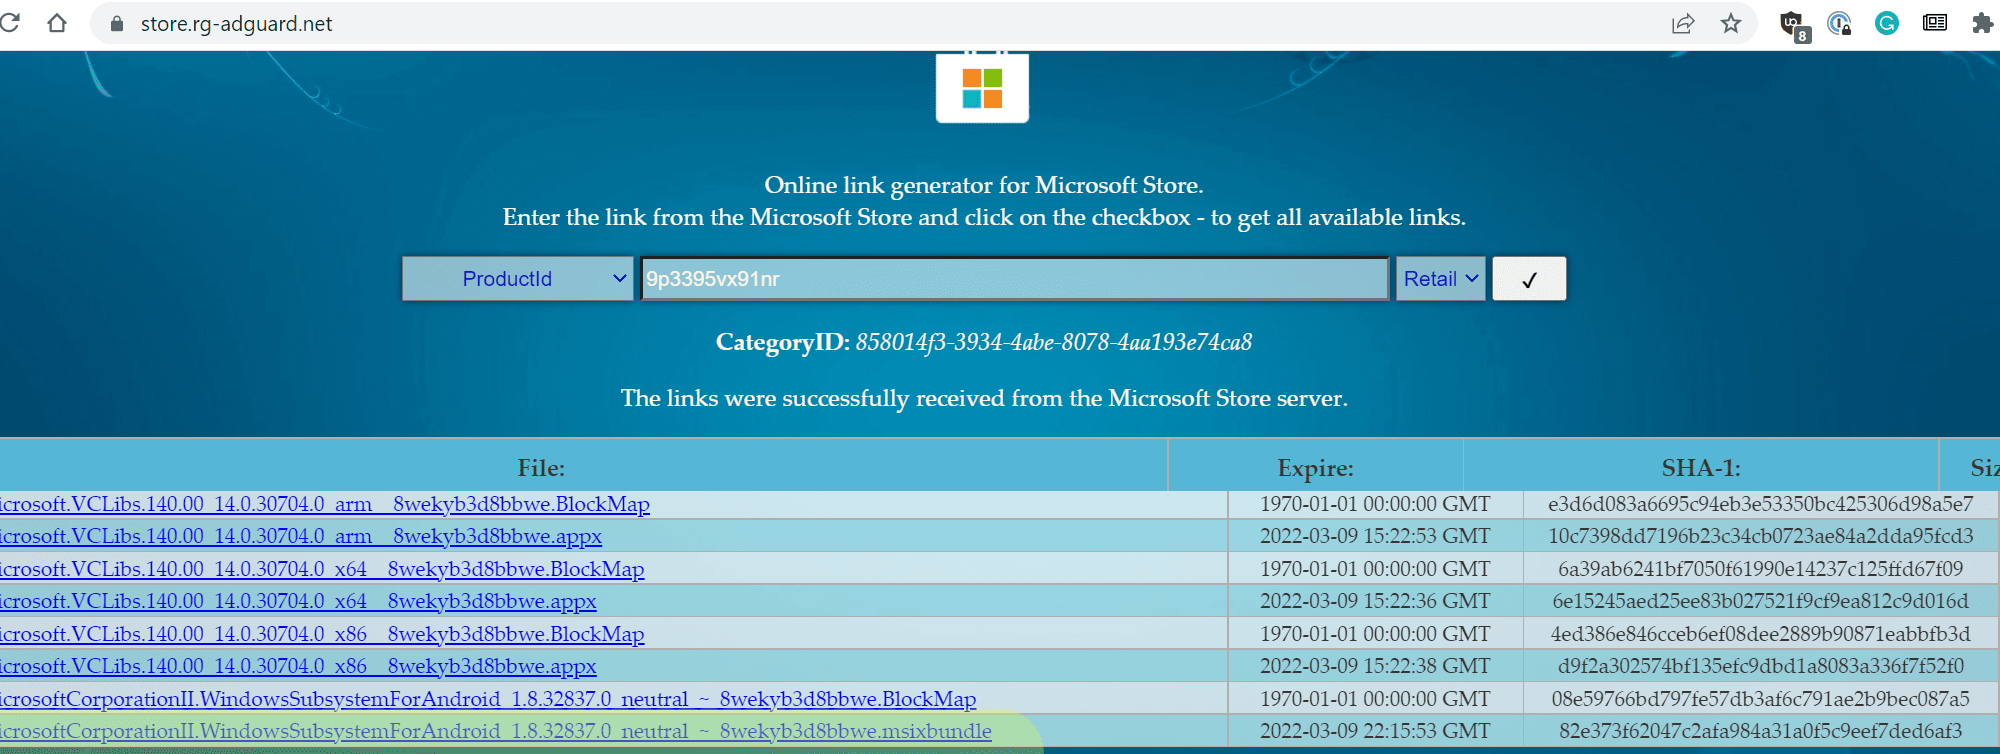
- 1) Open a browser and navigate to https://store.rg-adguard.net/.
- Change the search method from ‘URL (link)’ to ‘ProductId’.
- Enter the following term in the middle box: ‘9p3395vx91nr’, without quotes.
- Change the last box (‘RP’) to ‘Retail’ using the drop-down menu. Click the checkmark to search.
- At the bottom of the page, you’ll find a file with a ‘.msixbundle’ extension. This is the file we are looking for.
- Download the file by clicking on it. If nothing happens after clicking, try a different browser, such as Microsoft Edge. The browser is probably trying to block the download. Accept any pop-ups about downloading an ‘unknown file’. This download is safe.
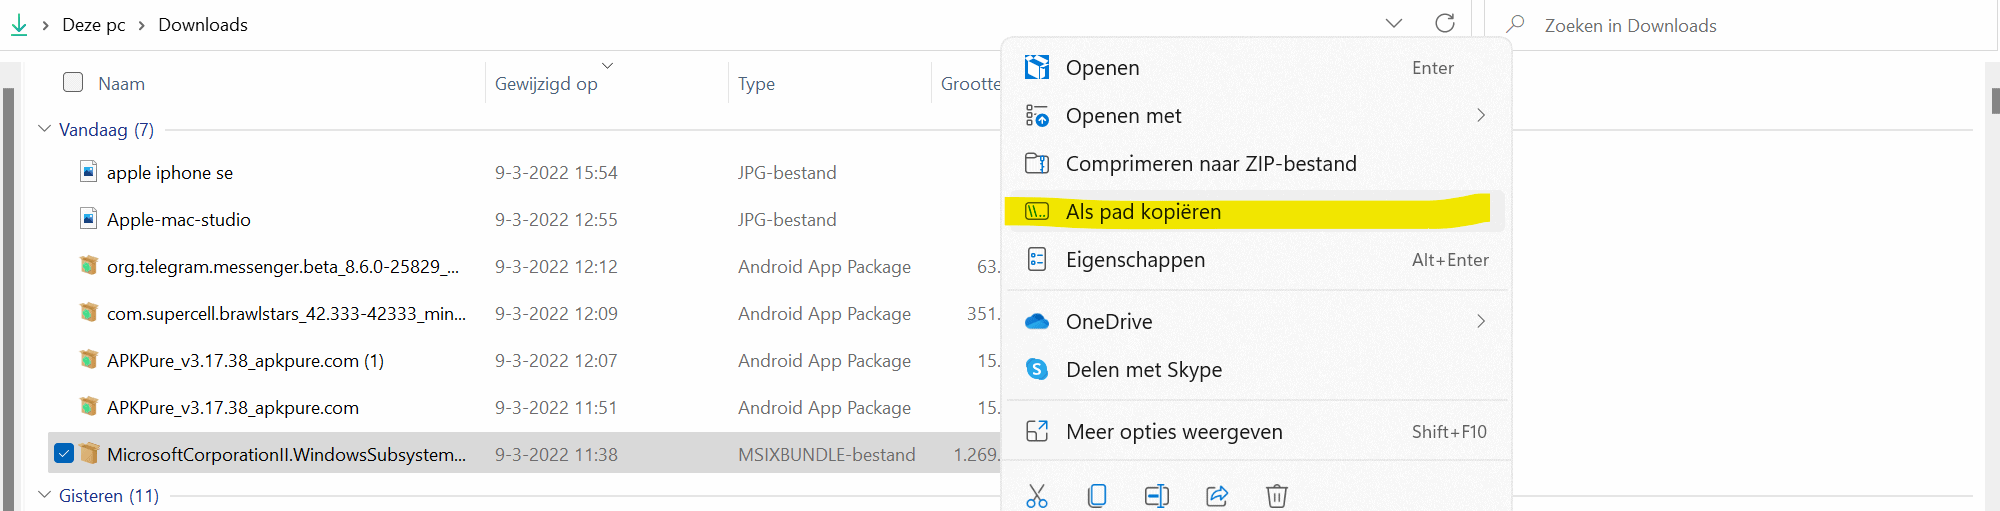
- 2) Copy the location of the downloaded file.
- Navigate to the location of the downloaded file. The default folder is ‘Downloads’, but the actual location depends on your system settings.
- Right-click on the file and select ‘Copy as path’.
- Navigate to the location of the downloaded file. The default folder is ‘Downloads’, but the actual location depends on your system settings.
- 3) Open Windows PowerShell or any other command prompt.
- You have several ways. We use the start menu, type in ‘PowerShell’ and run the app as administrator. Administrator is important: running the app without privileges will get you nowhere.
- Open PowerShell and type the following line: ‘Add-AppxPackage -Path’, without quotes. Leave the line for now — we won’t be pressing enter yet.
- If you’ve followed previous instructions, you’ve already copied the path of the downloaded file. If not, go back to the location of the downloaded file and press ‘Copy as path’ again. Add this file path to the line in PowerShell (Ctrl+V). To illustrate: check the full command line below.
Add-AppxPackage -Path “[enter file path here]”
- You have several ways. We use the start menu, type in ‘PowerShell’ and run the app as administrator. Administrator is important: running the app without privileges will get you nowhere.

- 4) Press enter. PowerShell instructs Windows to install the specified file.
- Are you getting an error message? Make sure PowerShell is running as administrator. Additionally, check for typos in your command line. Except for the file path, the line should be exactly the same as the example above (including quotation marks).
- After installation, you will find ‘Settings for Windows subsystem for Android’ in the start menu. Open the application and continue with step three.
Step 3: Final touches and WSATools
Lastly, we’ll be tweaking the settings of Windows Subsystem for Android, downloading third-party tools and actually running Android apps.
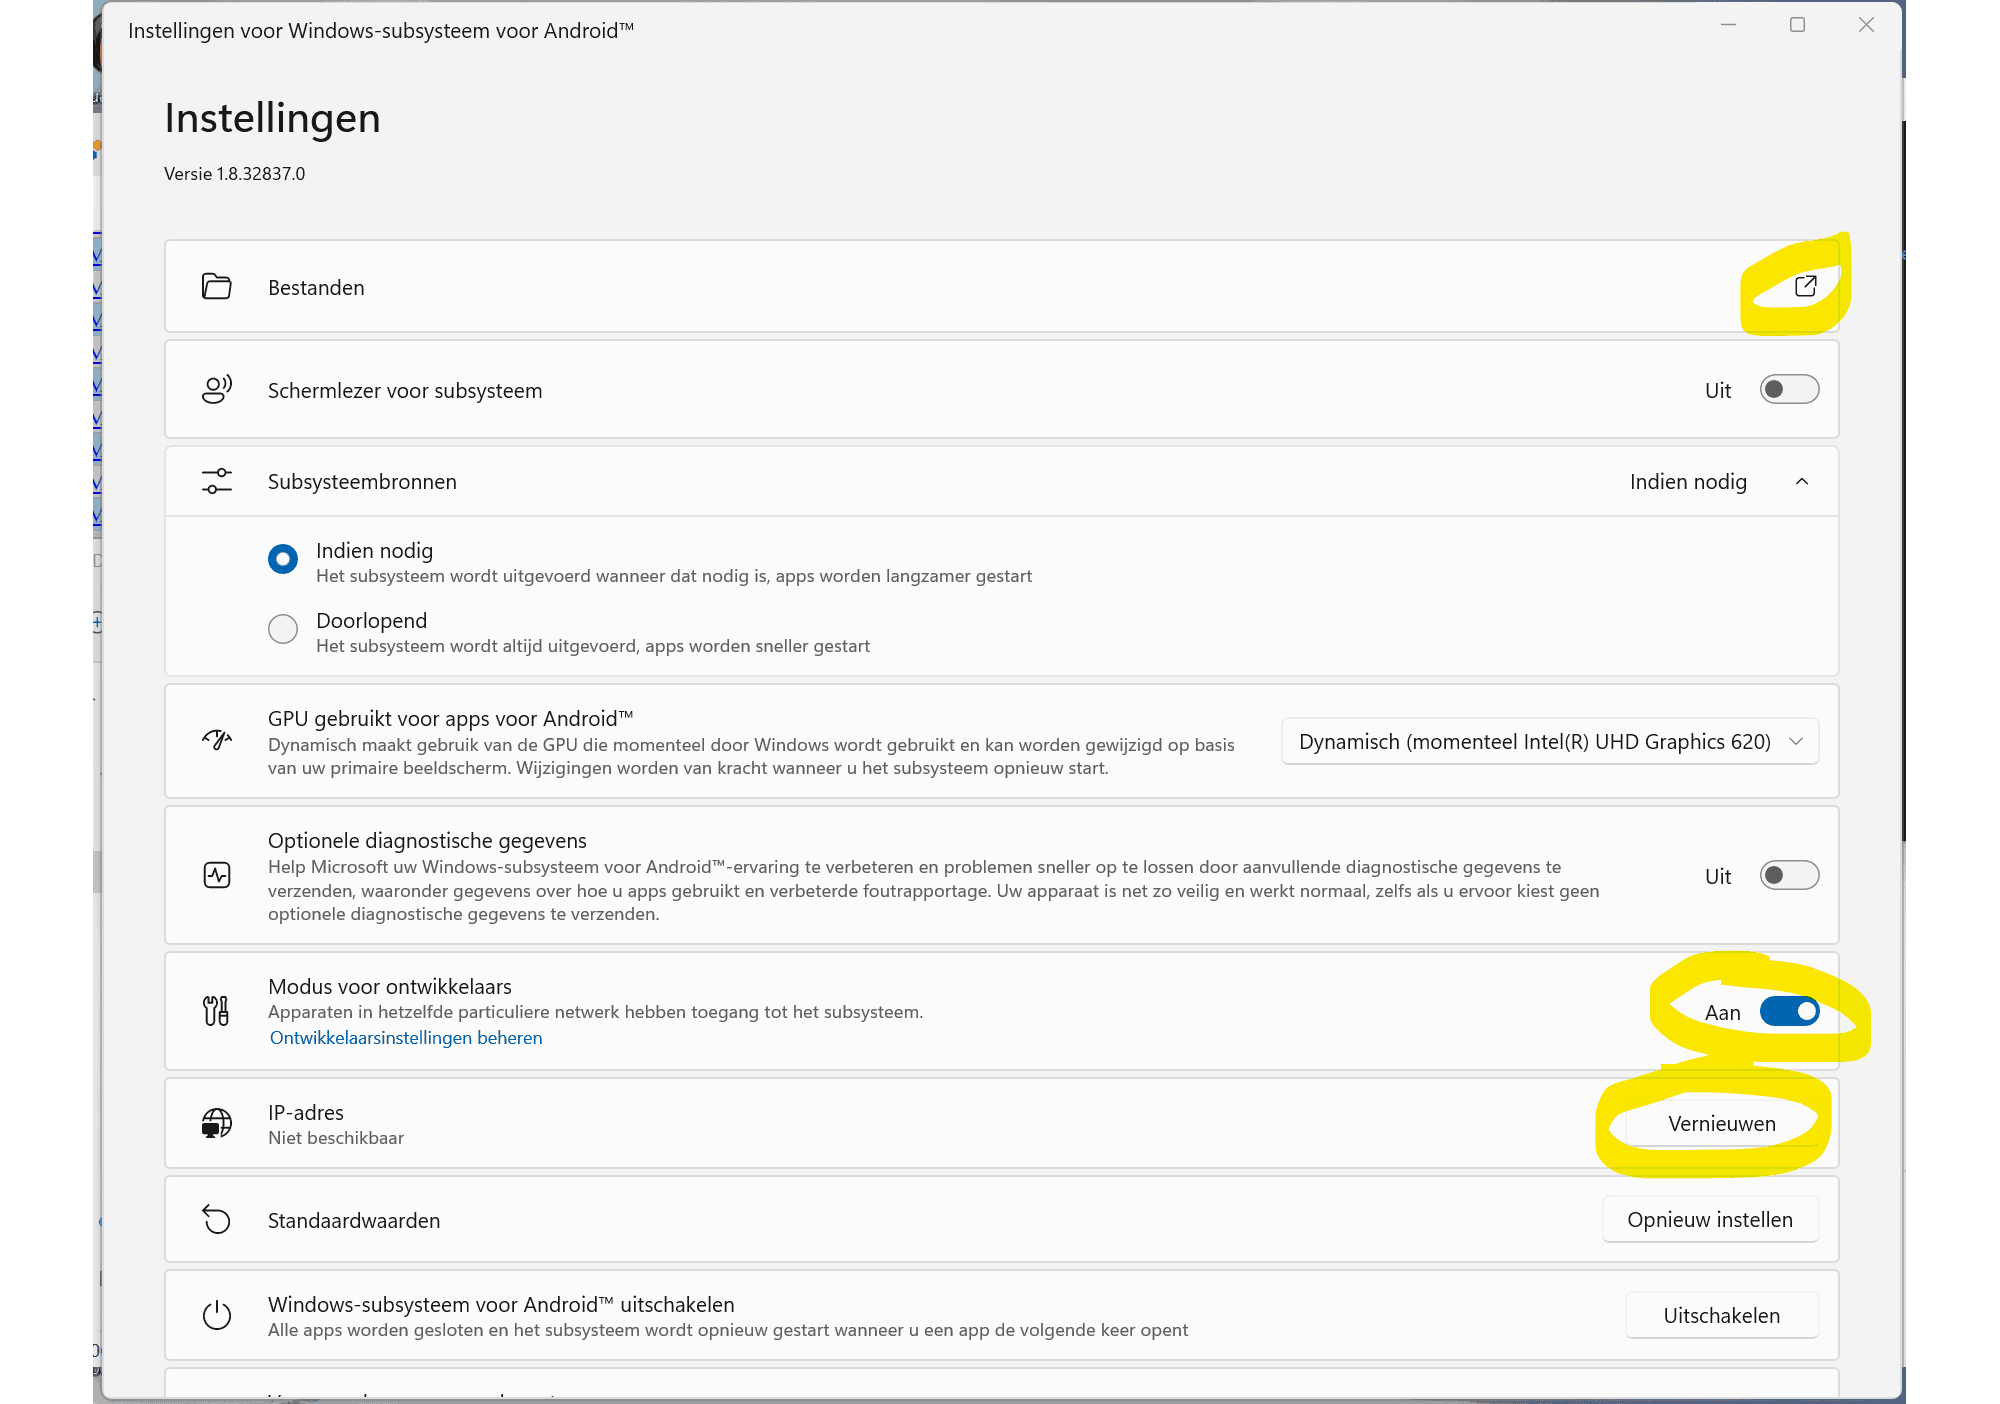
- 1) We’ll start with the configuration of Windows Subsystem for Android.
- Open ‘Settings for Windows Subsystem for Android’ from the Windows start menu.
- Place a checkmark at the ‘Developer mode’ box.
- Click on the icon next to ‘Files’, at the top of the window. This opens the program.
- We’ll run the program, but leave it for the time being. Go back to the settings.
- Glance at ‘IP Address’ in the bottom half of the window. Next to ‘IP Address’, you’ll see a button: ‘Refresh’. Click on it and the IP address will be retrieved.
- 2) We’ll install APKPure and WSATools to find and install Android apps.
- Open the Microsoft Store and search for ‘WSATools’. Download the program.
- Open the program. WSATools asks if you want to download ADB. Accept the download.
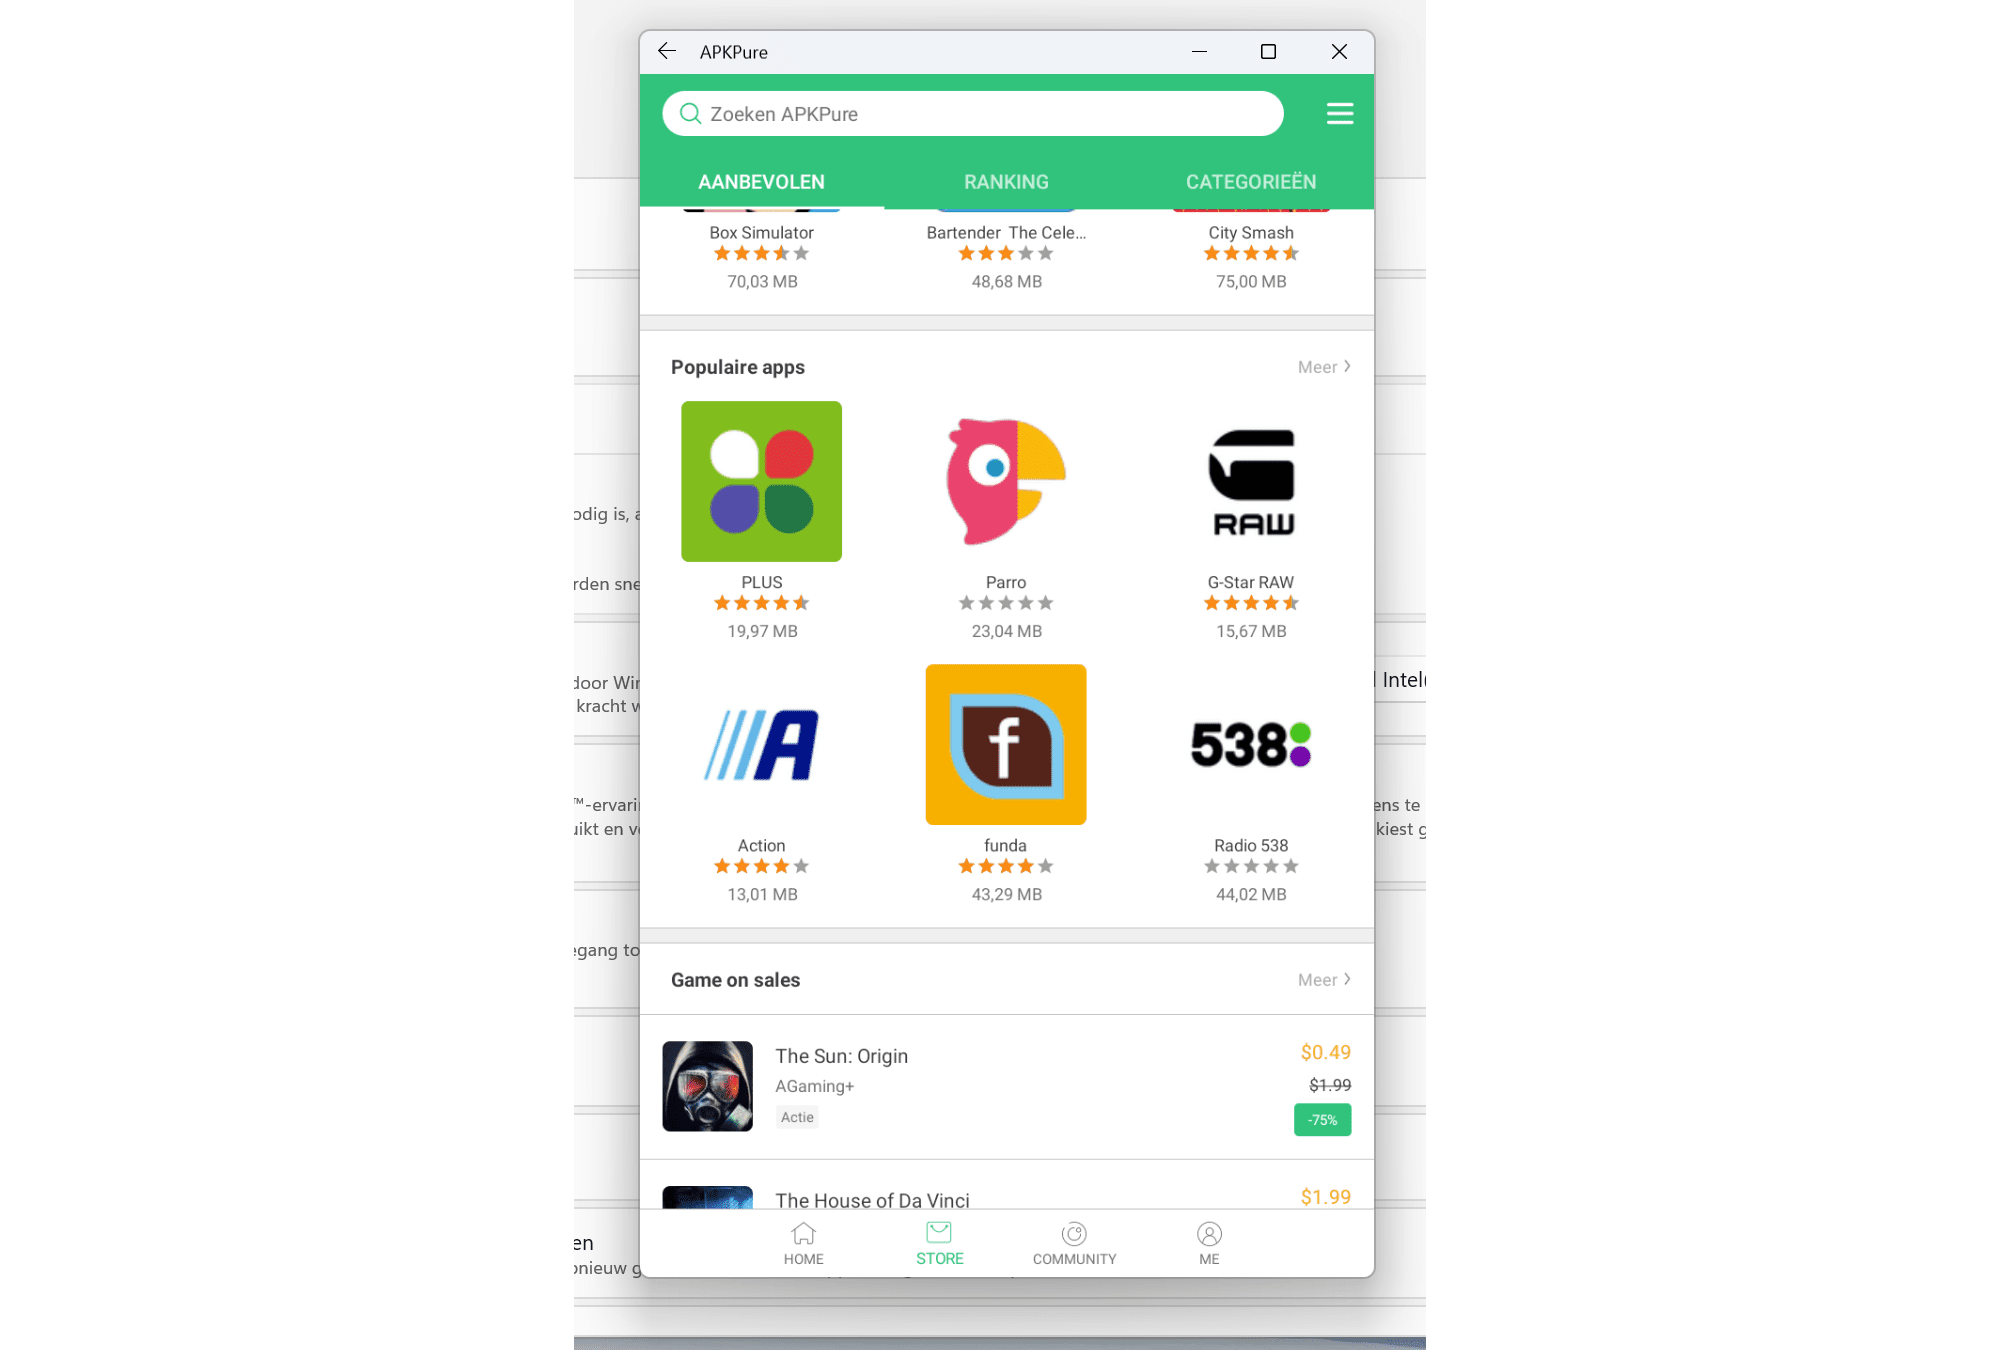
- We won’t be using the program yet. Open a browser and navigate to https://apkpure.com/.
- Download APKPure. This is an APK file. WSATools is capable of installing APK files.
- Open the APK file in WSATools and install.
- APKPure is immediately usable. The library offers a range of Android apps. After downloading and installing an app, you’ll find the app in APKPure and the Windows start menu. From there, the app is fully usable on Windows 11.
- 3) You don’t have to use APKPure, but we can’t recommend anything else.
- APK files are available from various locations. WSATools allows you to install and open APK files of your choice, regardless of the website on which you found the file. You don’t necessarily have to use APKPure, but since we can’t say anything about the safety of files in other locations, we can only recommend APKPure.